Here you have it! You are seeing some creations here first! Some more punch ideas with the newest SU! punch that will be available this August.
I actually didn’t purchase this yet. I wanted to play with it first to see if I really need it. Could it take the place of my corner rounder/slit punch?
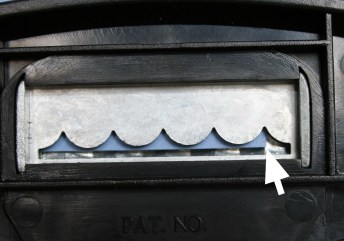
Here is placement of paper in punch for perfectly rounded corners:
Here are Squares created with the punch:
Here are the measurements you need for creating the squares:
2 scallops to a side = 13/16″ square piece of CS
3 scallops to a side = 1-3/16″ square piece of CS
4 scallops to a side = 1-1/2″ square piece of CS
5 scallops to a side = 1-15/16″ square piece of CS
6 scallops to a side = 2-5/16″ square piece of CS
7 scallops to a side = 2-3/4″ square piece of CS
8 scallops to a side = 3-1/8″ square piece of CS
9 scallops to a side = 3-1/2″ square piece of CS
10 scallops to a side = 3-13/16″ square piece of CS
AND SO ON!!! ETA….the measurements above are estimates due to where and how you line up the scallop punch. For the measurements I listed above, do not slide the piece of CS all the way in till it stops. I just found it easier (and lined up better) if I lined up the cs with the bottom edges of the scallop punch.
Here is a pic of rectangles I made perfect for sentiments:
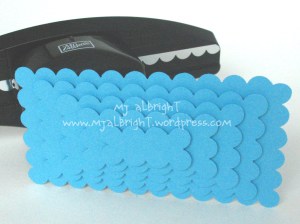 No specific chart for this due to you creating whatever size rectangle you need for an image or sentiment.
Here is a pic of some frames:
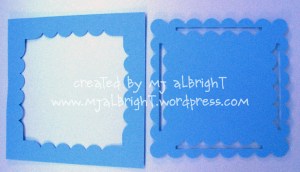 Tips for the frame on the right — omit to top and bottom inner punch and thread some ribbon originals or large twill tape through; insert a squared piece of cs into all the slots; to punch inside to create scalloping border within a frame for the image on the left….HAS TO BE 2-1/2″ OR GREATER SO IT FITS OVER THE PUNCH.
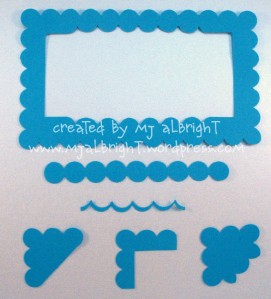
Here are some pics of frames, borders, and photo corners:
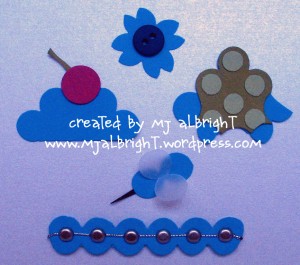
AND LAST BUT NOT LEAST….MY FAVORITE CREATIONS WITH THIS PUNCH:
A small flower, the top of a cupcake, a turtle, a bumble-bee, and how about some braces border to cheer up the kiddo who just had them placed:)
Here is the base image for the cupcake and turtle:
Now, get busy with this punch and see what you come up with. AND WAIT TILL YOU SEE WHAT I HAVE TO POST TOMORROW!!!! SO COOL.





I can’t believe you came up with all this stuff! I would NEVER have been able to do that! Even with your pics, I probably won’t! Mine comes soon, so I’ll have to practice! TFS!
So fun playing with you last night and glad I let you borrow my punch! You never, ever cease to amaze me!
Wow, you’re so talented! My imagination went as far as the square/rectangle, but not anymore, LOL. And you have yet MORE ideas?!?! I can’t wait!!
Cannot wait to get my hands on this punch! Thanks for the great post!
Wow, this is great! Makes me so excited for the new catalog!!!!
This is really cool. I saw someone had made rick rack with it too.
You are unbelievable! What talent! Thanks for sharing. Maybe one of these days we’ll actually meet up at one of Deb’s events.
Great ideas! Although I am not getting how you did the frames….
TFS!
WOW, that is all I can find to express my amazement at this! You are so much more clever than I am. Thanks for all the work in figuring this out for us!
Diane
You never cease to amaze!
So now the question is, Will you be getting one of these for yourself?
Cindy
That is so cool! Thanks for sharing!
You’re fabulous!!
Just WOW! OMG, Wowza, yahoo, I mean Wow, YKWIM? I have this on order for the 3-d Dream swap at convention and hope to make it work for my swaps before then- thanks so much for such inspiration! I’ll definitaly (sorry, I don’t have my glasses on and am typing this “Braille” like!) use this for my Office-on-the- Go- kit!!! You are so awesomely great for posting this!
Wow! I had no idea. I didn’t order it either thinking I would just use my slit punch.
You are simply genius! Now I totally have to get it. I’m dying to see tomorrow’s post!
Oh how fun! I haven’t preordered anything! I better get with it!!
leave it to you, you rock star stamper, to come up with these marvolous uses for this tool. TFS!
Oh
Just
Hush
UUUUUUP!
***bowing*** to your creativity!!!
~Bev
Holy Cow! You’re awesome…can’t wait til mine arrives…hopefully early next week.
Thanks for sharing!
I turn my Punch Queen crown over to you! WOW!!!!
There are no words…. just profound amazement!
I’m totally in awe!
Merci, merci, merci!
Hugs,
Renee
OMG! Ditto what Bev said above! I dont have to ask if you are ordering this………..?
Tanya
ooooh, Thank you, MJ for the awesome info for making SU-like Nestabilities! Let us know if you come up with any circle ones! 😉 You are a wealth of creative artistry!
so your gonna buy one now right! LOL Thanks for all the tips… you rock!!
This is just FABULOUS!!!! Thank you so much for sharing. Love it all.
LOVE the fun tutorial Mary jo. Thanks for the fun post, Jennifer 🙂
You are a genius! This is awesome! Thank you so much, you saved me a big headache trying to figure out if this was possible!
Wow these are so awesome. I am so glad that I reordered my scallop punch. Can’t wait to get it and try it out. Thanks so much for putting this tutorial together!
These ideas are fantastic! I’m going to put together a board to easily market this punch for my customers — hope you don’t mind if I case?! TFS! Jeanne
I am amazed – what a creative mind you have. I should have this baby next week and am saving this post to copy your wonderful ideas. You are amazing!
Incredible! Thank you for sharing, this is so cool!
You are just so darn creative! I love the braces – my dd gets hers in 2 weeks – will have to case that one for sure! TFS so many of your great ideas!
Love this punch! Wow what a creative mind you have. You must have had FUN doing all these ideas. Very inspiring.
What a great post to find this morning while blogging!! I love your ideas – thanks for sharing them with us!!
Thank you so much for the info on SU newest stamp..I love it and I bet you are buying it..I bet we all buy it….
OMGosh!! This is so completely amazing!! I can’t wait till my punch comes tomorrow. I’m going to try all of your wonderful ideas! Thanks for the inspiration.
WOW! No wonder you are a two time Artisan Award winner! You are SO creative! You are utterly amazing! 🙂
super tutorial! Love the idea and can’t wait until my order comes TODAY!!! 🙂
Oh yea, gonna want one of those for sure. You did more than I could have ever come up with by the way – man alive your brain is incredible.
I think this goes without saying, but your tutorial ROCKS!! Thanks for taking the time to share!
You are a true talent, thanks for sharing.
WOW! Cool stuff! I SOOOO want this punch!
That is just too cool, love all the different things you came up with to do with this one punch, makes me want to go play with the ones I have now 🙂
Ooh! I want it! Gotta have it! Thanks for sharing!
You are an absolute genius! This information is incredible. SU! should give you a free punch because you will surely help sell a lot! Thank you for taking the time to put this Tutorial together for us . . . if not, we’d only be punching scallop strips!
Cami
MJ – this is pure genius, I mean WOW!! I am so excited to see this, my new punch will be here tomorrow and I cannot wait to start playing!!! Thanks so much for sharing your fabulous creativity with us – it is much appreciated and one of the many reasons I love being part of this wonderful stampin’ community! *STAMPIN HUGS* Alex
MJ – You are so generous to share your creativity with us – thank you! LOVE what you have come up with.
Oh my goodness MJ!! This is fabulous! I can’t wait for my punch to arrive today now…hehe! You are so stinkin’ creative!! Thanks for sharing!~
You are the Queen!!!
What wonderful options you have shown us for the new punch. Using your ideas, I should be able to sell a bunch of these. I just can’t tell you how wonderful you are and thanks so much for taking the time to find out what else can be done with this great new product.
Nellyne Heath
Denton, TX
Thanks for those dimensions – I felt like a dork when I couldn’t get the ends to end up just right. I kept getting wonky shapes on the ends because of my CS dimensions. This will help tons. Take care!
Damn it! I didn’t order this when I sent my order, and now I regret it!
You rock! Great presentation! I love mine too and hope to demo it soon to my customers in Spring Green. Once the flood water recedes we may get a normal routine back.
there is no doubt in my mind why you are winning the artisan’s award this year! these are so great and such a help as i consider what to buy at convention or before! think i’m gonna have to get that punch BEFORE! so great for those of us who don’t have cuttlebug folders or spellbinder dies and want to make scalloped squares! thanks so much for sharing…
You brilliant little thing! 🙂 Love all the stuff you’ve come up with!!!
You are brilliant!! Now I think I must have this punch. WAy cool!!!
Wow! Thanks so much for the fabulous ideas. The picture of the turtle and other things isn’t showing up though.
How creative, thanks so much for sharing.
YOU are sooo SMART!!! Thank you for sharing this info! It will come in very handy for a lot of us I’m sure!
When I see posts like this, the world GENIUS comes to mind! Seriously! And so does the word PATIENCE! Thanks for taking the time to do this for the benefit of everyone out there who would put it to work! Off I go to play! Thanks for the inspiration!
Omigosh, that is AWESOME!! Thanks so much for sharing this – I have the punch in my grubby little hands and have been playing with it, but these are fabulous ideas!!!!! Yippee!!
Totally awesome! Thanks so much for sharing this with everyone! I’m sure there will be a mad rush to buy these! I know I will. 🙂
[…] Scalloped Squares Galore! https://mjalbright.wordpress.com/2008/07/09/scallop-edge-punch-introduction/ […]
Amazing. All of your calculations are entrancing and I don’t even have the punch, LOL. Great work and thanks so much for sharing your talent! :o) mel
WOW you are most creative and I appreciate you sharing with the rest of us who just CASE 🙂
Incredible! Very decorative!
jen 🙂
Love this – THANK YOU!
You really are amazing to pick this up and be able to do this so easily. I still can’t get my corners to come out as beautiful as yours…what am I doing wrong?? Please help!! Jackie
Hi,
Thank you for all those measurements!
But……….., how do you turn the corner? Where is the spot to line up for side 2?
Could you show a picture of that please? My corners always look like pumpkins, with a little stem. Cute, but not what I had in mind….LOL
Please help.
I have figured out a couple of the designs that you show but no where near the total. I am truly impressed. Thanks for sharing.
Joan Gattozzi
Wow! You are one creative lady! TFS!
[…] Lies Within -> Measurements for Squares & Rectangles with Scallop Edge […]
Hello!
Very Interesting post! Thank you for such interesting resource!
PS: Sorry for my bad english, I’v just started to learn this language 😉
See you!
Your, Raiul Baztepo
[…] able to create those cute scalloped edges in just a few punches! And there’s more! Check out Mary Jo’s blog where she shows even more ideas for the scallop edge […]