beauty lies within

expressing self by creating

make a wish December 31, 2007

I made this card for sketch challenge MFTSC10 over at SCS.  I’m like 2 weeks behind on sketches due to the holidays and such.  So today is catch up day until this evening than it’s party time…that’s a big joke here!  (Everyone falls asleep and I end up by myself watching the festivities on the TV — and stamping..lol)

MFT you take the cake card

I used MFT You Take the Cake stamp set for this card.  It was pretty simple to make.  The only details I spent time on was the cake.  I know they sell Liquid Applique in colors but I only have white.  I squeezed some onto a plastic plate and added a drop of Cameo Coral ink from a re-inker, mixed with a tooth pick, and applied to my stamped image.  Lightly sprinkled Dazzling Diamonds over the wet Liquid Applique.  Heated to set.  For the candles, I used my Summer Sun Stampin’ Write Marker and my Color Spritzer tool to add a little more details to the candles.  I wanted to add Crystal Effects to the flames of the candles and forgot to do (I will add that when I done writing here).

MFT you take the cake card upclose

STAMP SET USED:  MFT You Take The Cake

CARDSTOCK USED:  Papertrey White; KI Memories My Girl Pop; SU! Certainly Celery, Pretty In Pink, and Regal Rose.

INKS USED:  Brilliance Graphite Black; SU! Pretty In Pink, Regal Rose, Certainly Celery, Blush Blossom, Mellow Moss, Soft Sky, and Always Artichoke Classic Stampin’ Pads; Summer Sun Stampin’ Write Marker; Cameo Coral re-inker.

ACCESSORIES USED:  Regal Rose 5/8″ Grosgrain Ribbon; Making Memories Velvet Brads; 3/16″ Corner Rounder Punch; Horizontal Slot Punch; Dazzling Diamonds; Aqua Painter; Liquid Applique; Marvy Square Scallop Punch.

I WISH YOU ALL A SAFE & HAPPY NEW YEAR.


good to have…

a wedding card on hand.  This is an occassion that always sneaks up on me…when someone I know is “Going To The Chapel”.   I can finally say that I’m prepared.  My friends (and co-workers)  are getting married in 2008 and this will go to my friend Julia.  When I got married, I know there were a couple duplicate cards that I received from a well-known card store — it makes me happy to know this is a one of a kind made especially for her:)

 MFT going to the chapel  (Followed MFT sketch08 at SCS)

I used MFT Going To The Chapel stamp set for this card.  Check out this set…there are so many cute images with tons of sentiments.    I used every sentiment from the set on this card.  The main sentiment is “da dum dee dum” and all the others are on the Chocolate Chip CS base. 

The main image is really neat.  I wanted the dress to be white but wanted a Very Vanilla CS background.  I stamped the image two times on Papertrey White CS:  one with Brilliance Graphite Black ink and the other with Close to Cocoa ink.  The Black ink image — I colored in the hair, body, and flowers & carefully cut out.  The Close to Cocoa image — this is the dress.  I then stamped the image again on Vellum with Opaque White Stazon Ink — this is how I created the veil.  On a piece of 1-7/8″ x 2-5/8″ Very Vanilla CS, I pieced the image together.  Because the bride was 2 pieces, this also gave me the ability to make the bouquet pop out (I stacked 3 mini-glue dots on top of one another beneath the flowers to create dimension).  Finally, added little beads of Liquid Pearls (silver) the the bottom of the dress.

MFT going to the chapel upclose 1

Here is a pic of the sentiment & accessories upclose:

MFT going to the chapel upclose 2

STAMP SET USED:  MFT Going To The Chapel

CARDSTOCK USED:  SU! Chocolate Chip, Very Vanilla, and Kraft CS; Papertrey White CS; Vellum.

INKS USED:  Brilliance Graphite Black; Stazon Opaque White; SU! Chocolate Chip, Close to Cocoa, Blush Blossom, and Pretty in Pink Classic Stampin’ Pads.

ACCESSORIES USED:  Slit Punch; Chocolate Chip Satin Ribbon;  Beachfront Ribbon Originals; Aqua-Painter; Stampin’ Sponges; Ticket Corner Punch; K&Company LaBoutique Wedding Pearl Brads; Liquid Pearls (silver); Mini Glue Dots; Stampin’ Dimensionals.


wanna be my valentine giveaway December 29, 2007

Here is a cute hot chocolate treat box just perfect for my friends out there in blog-land & to get you motivated for Valentine’s Day:

              like you a latte gift       like you a latte gift upclose

All you have to do is write a comment about a cute (clean) Valentine’s Day story.

My story is just this (and I wanted to write about it so I remember it forever).

Last year, on Valentine’s Day, we had a really bad ice storm here in Pennsylvania with interstates & stores closed for days.  I planned ahead to make a really special dinner for my husband John.  I bought all the necessary things for a romantic dinner in our dining room which included all things necessary to create a restaurant-like environment.  I even made up a menu.  Why you ask?  Well, with kids, I didn’t want to go out anywhere and I wanted them involved in our romantic dinner (and actually we were all stuck in the house).  The kids ran the “restaurant” and were hostesses, waiters, chefs, etc.  It was so much fun and they had a blast.  I had the food cooked and everything from salads, bread, and entrees were properly in line for them.  We did some trial runs before John got home.   I was kinda upset when I didn’t get anything in return from my husband (is that selfish??)  But I kept saying in my mind, “how could he….all I do…blah…blah…blah”.

Well, due to the ice storm, my present was postponed.  A few days later, the doorbell rang.  I could see through our door that there were 5 very old men in tuxedos holding roses.  I scratched my head and chuckled thinking they had the wrong house or something.  I opened the door and they informed me that they were a singing quartet and my husband wanted them to come sing to me but they couldn’t arrive on V-day.  They started singing, harmonica and all.  I couldn’t stop laughing….all 5 of them had to be over 80 years old.  I just couldn’t get “romance” out of these men singing love songs to me.  And, I was holding my Ethan in my arms and he was covering up his ears with his hands. 

I so love the things my husband does for me.  Now, when I look back on the singing, I truly can say he comes up with the most awesome things to surprise me and I appreciate him:)

Now write a little comment about some funny Valentine’s stories, and I will select 9 winners to receive these hot chocolate holders when I arrive at 70,000 hits (yep, also have the other blog candy giveaway running at the same time):

                                      like you a latte gift giveaways

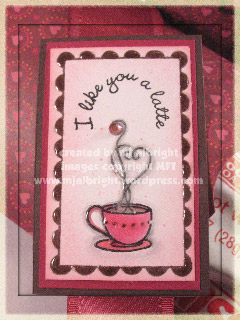
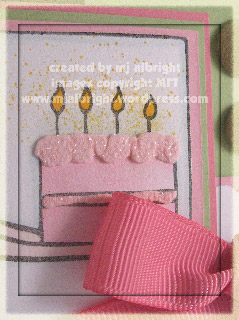
STAMP SETS USED:  MFT Hearts Galore & Icing On The Cake stamp sets.

CARDSTOCK USED:  Papertrey White; SU! Chocolate Chip & Purely Pomegranate CS; K&Company Smitten Treat Boxes.

INKS USED:  Versafine black ink; SU! Chocolate Chip, Purely Pomegranate, Regal Rose, Pretty in Pink, Going Gray, and Basic Gray inks; uni-ball Signo White gel pen; Pretty in Pink Stampin’ Write Marker.

ACCESSORIES USED:  Crystal Effects; Stampin’ Sponges; Purely Pomegranate & Chocolate Chip Satin Ribbon; Spritzer Tool; Pink Self-Adhesive Rhinestones from KAISERscrapbook; Swiss Miss Hot Chocolate pack.


valentine lolly pop bouquet December 28, 2007

I ran out the my local pharmacy the day after Christmas and couldn’t believe that they had Valentine candy on the shelves.  So I took advantage of this and picked up some lolly pop bundles.  There are 6 heart shaped lolly pops on long thin plastic sticks in a bouquet.  I added my own touch to it and think it turned out pretty darling:

valentine lolly pop bouquet     valentine lolly pop bouquet full pic

This was actually not that hard to make and it is all Stampin’ Up! products.

I started out using Pick A Petal stamp set and stamped some petals with Wild Wasabi ink on Whisper White CS.  Cut out and adhered right beneath the heart lolly pops with Mini Glue Dots.

I wanted to cover up the white plastic sticks of the lolly pops so I covered with strips of Wild Wasabi CS, Sticky Strip & a 2-Way Glue Pen.  To make the very bottom of the “stem” neater, I simply continued to wrap a 1/4″ strip of Wild Wasabi CS and used a 1/2″ Circle Punch to cover the bottom:

valentine lolly pop bouquet stem details

For the tag, I kept it simple but added some little touches.  Have you seen Spellbinders Nestabilities (that everyone is using) but wanted to stick to using Stampin’ Up! products?  Well, take advantage of the Classy Brass Template Punches Plus…much more affordable and coordinates with the Stampin’ Up! punches.  I started out dry embossing the large square on the template to a piece of Kraft CS, stamped the “xoxoxo” from Holiday Blitz stamp set with Wild Wasabi ink, punched out with my 1-3/8″  Square Punch, then used my 1/8″ Circle Punch to one of the upper corners.  Next, stamped the heart circle image from Holiday Blitz stamp set with Regal Rose ink on Whisper White CS, punched out with my 3/4″ Circle Punch, attached to tag with a Stampin’ Dimensional, and added some paper-piercing details using the template.  Wrapped Hemp Twine several times around the base of the leaves, threaded up through the hole of the tag, and tied a knot:

valentine lolly pop bouquet tag upclose

A sweet bouquet to give to the special someone. 

Have a wonderful weekend:)

Don’t forget the sketch challenge and blog candy give away.  DETAILS –> HERE


twas the night before christmas… December 24, 2007

and I’ve been asked by some people what my home looks like for the holidays.  I thought I would give you a glimpse of my personal life & my home on the night before christmas.  This has not been a good day…trying to get so much prepared and my little Ethan woke up with the flu.  I just put him to bed and I think he’ll be much better by the am.

Here is my foyer:

front door - foyer

Festive red berries decorate the lighting in my home with outdoor traditional decorations:

holiday lighting                  outdoor decorations

(Some here in Central Pennsylvania leave the candles in their windows year round.)

Stockings and handmade ornaments from the kids hung with care:

stockings hung                    ornaments hung

Can’t forget the dog.  Last year he ate the cookies my youngest left on the harth for Santa.  He did it again tonight.  It really doesn’t bother me.  It has become a little tradition for the dog I guess.  We need the cookies to be eaten anyway, so we just let it go (we just remove  certain cookies from the plate that are not dog-friendly before letting him do his thing):

for santa              bailey and his cookies  

Merry Christmas to all.  And to all a good night!

Just a reminder of the sketch challenge a couple posts down with some candy:)


my heart aches… December 23, 2007

this time of year.  I’m balanced with a festive feeling and a sadness for others who are not as fortunate and blessed, or may be having difficult times, or even worse — a child having to be hospitalized during this time. 

I try to teach my kids that there is WAY MORE than toys & must have items.  I’m the very first to say they can be spoiled.  I mean, we all want our kids to have more than what we had….but I want them to be appreciative as well.  I’m a firm believer that it is way better to give than to receive, so I spent yesterday out and about doing some things to make my heart ache a little less.

Last year, I won SU! Artisan Award.  I took $200 of my winnings and purchased Stampin’ Up! kids Tattoo Kits.  My plan was to donate them to my local hospital for kids to use as therapy during hospitalization.  I held onto them until Christmas time so they could go to kids who would be in the hospital during the holidays.  I happily delivered them yesterday to my local Hershey, PA Ronald McDonald House:

               su! tattoo kits donation

                                                   su! tattoo kits donation upclose

                    hershey, pa ronald mcdonald house

I’m such an emotional goof.  There is no other gift I could receive this holiday season that could make me feel more happy inside.  I was so proud to deliver these tattoo kits knowing that they will bring a smile to someone’s face.

That wasn’t enough.  I now had to teach my kids to be thankful for having what they have and that they will have a good traditional meal with family on Christmas Day (I tend to dislike hearing the “do we have to go?” remarks from them).  So, next was a trip to inner city Harrisburg, PA to donate hams and other foods to a mission. 

hbg, pa mission  I wish I could do more.  This is the front entrance with donations from people left at the door and some notes written on an easel. 

I HOPE that EVERYONE has a very MERRY CHRISTMAS!

Done bloggin’ until the holidays are over. 


oops! I did it again! December 21, 2007

I wanted to share with you an exciting email I received last night from Stampin’ Up!

I am the winner of December’s Wow! Art File Contest.  Now, we demos have to wait 3 months to see my entry in the next on stage magazine.

What did I make?  Oh man, where to start:

It took me about 45 hours to make this project… I had a Cosmo Cricket plain chipboard cigar box here that I purchased a year ago to use for the Artisan Award and decided not to use it.   I wanted to make a stationary box that contained cards & envelopes.  I used the new level III stamp set Time Well Spent.  I stamped, watercolored, applied Crystal Effects to all of the flowers, and went wild with the design.  I cut out about 48 flowers total and some of the centers to the flowers (so somewhere around 80 cut outs)…yep, my hand still hurts.  The whole box was covered with Soft Sky Prints DSP and all edges sanded.  Inside of the box contained 5 cards (they were all the same) decorated to coordinate with the outside of the box.  Also included 5 envelopes that I also decorated with ribbon, flower, etc. 

What I used: 

Time Well Spent and Linen Background Stamp; Rose Red, Soft Sky, Certainly Celery, Close to Cocoa, and Shimmery White Cardstock; Soft Sky and Certainly Celery Prints Designer Series Paper; Rose Red, Soft Sky, Certainly Celery, and Close to Cocoa Classic Stampin’ Pads; Stazon Jet Black and White Ink Pads; uni-ball Signo Gel Pen; Whisper White Medium Envelopes; 1/16″ Circle Punch; Ticket Corner Punch; 3/16″ Corner Rounder Punch; Crop-A-Dile Tool; Sanding Block; Stampin’ Sponges; Aqua Painter; Sticky Strip; Stampin’ Dimensionals; Mini Glue Dots; Crystal Effects; Vintage Brads Assortment; Pewter Jumbo Eyelets; Crafters’ Tool Kit; 1/4″ Certainly Celery Grosgrain Ribbon; Soft Sky Double-Stitched Ribbon; Linen Thread; Wire Works; Chipboard Card Box; Acetate Sheet.

I’m so happy.  I haven’t entered many contests lately, so this is good!

Merry Christmas & have a safe New Year.


blog candy and a challenge for you December 17, 2007

I’m approaching the 60,000 hits mark.  I’m so shocked by all the kind comments you all leave me.  With the holidays right around the corner, I wanted to show my appreciation by giving someone the opportunity to win some awesome candy.

This was hard for me to take that leap and present a sketch challenge.  I don’t consider myself one of the famous girls (LOL, you all know who you are)…so I’m really curious to see the turnout for this:)

blog candy giveaway challenge              a beautiful thing card  

Not that bad of a sketch for a first timer right?  I had to use some of my new goodies for this one.  I used A Beautiful Thing stamp set and Bali Breeze DSP for this sample.

The card base is Purely Pomegranate CS 4-1/4″ x 8-1/2″ folded in half and corners rounded with my 3/16″ Corner Rounder Punch.  Next layer is Pumpkin Pie CS 4-1/8″ square with corners rounded.  Final base layer is a 4″ square piece of DSP from Bali Breeze with corners rounded.  The green piece of paper running horizontally is a 2″ x 4″ piece of Bali Breeze DSP.  Layered a 1-3/4″ x 4″ piece of Vellum on top of this.  Added some paper-piercing to the right side. 

The main image is a 2″ x 2-3/4″ piece of Whisper White CS.  Used Pumpkin Pie, Taken With Teal, Old Olive, and Rose Red Stampin’ Write Markers to the sentiment and stamped.  The 4 flowers (2-step stampin’) along the top of the sentiment were first stamped in Purely Pomegranate ink, layered a Vellum circle punched with my 1/2″ Circle Punch, then added the Pumpkin Pie ink stamped flowers to the insides with a Mini-Glue Dot.  Adhered to card base.  Added 5/8″ Old Olive Grosgrain Ribbon.

The medallion is 6 layers of cardstock with a Ice Circle Rhinestone Brad in the center.  Going from back to front:  Scallop Punched Vellum; Scallop Punched Purely Pomegranate; Scallop Punched Pumpkin Pie 2 times (see pic below); 1-3/8″ Circle Punch to a Piece of Bali Breeze DSP; 1-1/4″ Circle Punch to Old Olive CS; Stamped the flower on Whisper White CS with Purely Pomegranate ink, 2-step stamped the details of the flower with Versamark Ink and added White Embossing Powder, cut out and attached; added Rhinestone Brad.  

ADDED ***I have received a couple emails asking, “How did you get the scalloped piece of Pumpkin Pie CS back into the punch and placed just right?”  Just apply a small amount of snail to the middle and guide with your finger where you need the piece of cardstock to be.  You can use a Mini Glue-Dot or even a needle.  It shouldn’t matter what you apply to the middle to get the correct placement because it will be covered up with another layer of cardstock.  If it isn’t going to be covered, use an Adhesive Remover or a Stampin’ Dimensional (they just rub right off).  Hope this helps and feel free to ask any other questions:)

           a beautiful thing card upclose

                                                           scallop punch detail

 What is the blog candy you ask…..Well, it’s a SU! unmounted Level 1 stamp set So Many Sayings, A roll of Chocolate Chip Satin Ribbon (all 15 yards), and this Ghirardelli Chocolate Acetate gift I made:

blog candy giveaway challenge 60,000    All you have to do is make a card with the sketch that I provided above.  Post your comment with the link to view your card.  I’m going to keep this open until the beginning of January due to all of our busy schedules.  I will use Random.org to pick the winner and will post this probably in the first week of January. 

Hope you all play.  Can’t wait to see your creations:)…. AND GOOD LUCK!!!


special delivery…it’s a boy! December 16, 2007

Now that I have your attention…. I received my new stamp sets this past week from SU!  I don’t think I have ever purchased a baby/nursery set before, but I instantly fell in love with the elephant image in the Nursery Necessities stamp set, the Nursery Letters Jumbo Wheel, and the large Star Punch.  Aren’t they the cutest.

I made this card for Jen del Muro’s Sketch For You To Try (SCS keyword SFYTT).  You can check out the details at Jen’s Blog:  i{heart}2stamp .

nursery necessities card  Isn’t this stinkin’ cute? 

Here is an upclose so you can see the Letters Wheel stamped image and the large star is embossed with Crystal Clear EP. 

nursery necessities card upclose

So I don’t have to keep re-typing this in the directions…ALL cardstock edges where sponged with Going Gray ink.

The card size is 4-1/4″ x 8-1/2″  Basic Gray CS folded in half.  I cut 1/2″ off of one of the ends and placed a scalloped piece of Bashful Blue CS created with my 3/16″ Corner Rounder Punch.  Added a 1/4″ strip of Going Gray CS over the Bashful Blue strip and added faux-stitching created with Paper-Piercing Tool from Crafters’ Tool Kit and a White uni-ball Signo Gel Pen.

The Bashful Blue CS was wheeled with Nursery Letters Jumbo Wheel and Versamark Ink.  Applied Crystal Clear EP and heated to set.  The piece measures  2-1/4″ x 4-1/4″.  Used 1/2″ Circle Punch to Going Gray CS, and Blue Ice Circle Rhinestone Brads to the right of the card.  Before adding the ribbon, I adhered the two bottom layers of the main image to the Bashful Blue wheeled piece.  They are Going Gray CS 2-5/8″ square and Basic Gray CS 2-1/2″ square.  Next tied Basic Gray Taffeta Ribbon in a knot to the right side.

For the main image (you already have the two bottom layers attached) — I stamped the elephant and sentiment in Basic Gray ink on a 1-7/8″ square of Going Gray CS (it’s like you have to because of the ear).  Next layer is Bashful Blue CS punched with a Marvy Square Scallop Punch (only non-SU! product…just replace with a 2-1/8″ square piece of Bashful Blue CS).  Final layer is a 2-1/4″ piece of Whisper White CS.  Attached to the already adhered 2 bottom pieces with Stampin’ Dimensionals (so the knotted Taffeta Ribbon is running through the matting of the main image).  Stamped the alphabet star from the stamp set in Bashful Blue ink on Whisper White CS.  Covered with Versamark, Crystal Clear EP, and heated to set.  Used my NEW Large Star Punch to punch out.  Used Star Punch and Basic Gray CS to create the smaller star.  Added a Blue Ice Circle Rhinestone Brad and attached to card using a Stampin’ Dimensional.

This is a keeper I must say.  I may just create a scrapbook page out of it featuring my little boy.


I’m so excited!!! I’m glowing today. December 7, 2007

The wait is over.  If you are a Stampin’ Up! demo, Onstage is now online and will be in your mailbox shortly.  This is one of the perks to being a Demo…getting this magazine and seeing the amazing work of fellow demos.   And due to Stampin’ Up! policies, this work is their property, so I can’t post it here for non-demos to see.  Take my word, I worked hard:)

This is the first time one of my creations was altered by SU!’s design team and made it to the cover page.  It makes me want to cry to see my daughters name on the front cover, and my creations (I’m silly, I cried at convention when I saw pics of my kids displayed).   I cried with the last issue…I opened it up, and there was a pic of my little son Ethan in the contents. 

Oh, can’t forget the online extra they also posted.  It is a garland that coordinates with the Thanksgiving Place Setting. 

Go check it out.  Have a wonderful day:)